Battery switch on travel trailer function is crucial for managing your RV’s power. Understanding how your battery switch works is key to avoiding frustrating power outages and ensuring a smooth camping experience. This guide will walk you through the different types of switches, wiring diagrams, installation, maintenance, and troubleshooting, equipping you with the knowledge to keep your travel trailer running smoothly.
We’ll cover everything from choosing the right switch for your battery setup (lead-acid, lithium-ion, single or dual battery systems) to safely connecting them and understanding the interplay between your switch, inverter, and other electrical components. We’ll also tackle common problems and show you how to diagnose and fix them yourself, saving you time and money.
Understanding Battery Switch Functionality in Travel Trailers
A battery switch is a crucial component in a travel trailer’s electrical system, allowing you to manage power flow between your house batteries and the tow vehicle’s charging system, or to isolate the batteries completely. Understanding its function is essential for safe and efficient RV operation. Properly managing your battery power ensures you’ll always have power when you need it.
Types of Battery Switches Used in Travel Trailers
Several types of battery switches offer varying levels of control and complexity. Common types include simple on/off switches, rotary switches offering multiple positions (like “off,” “battery,” “both,” and “tow”), and more sophisticated digital switches with monitoring capabilities. Rotary switches are frequently found in travel trailers due to their balance of simplicity and functionality. Digital switches, while offering more advanced features, come with a higher price point.
Typical Wiring Diagrams for a Battery Switch Setup
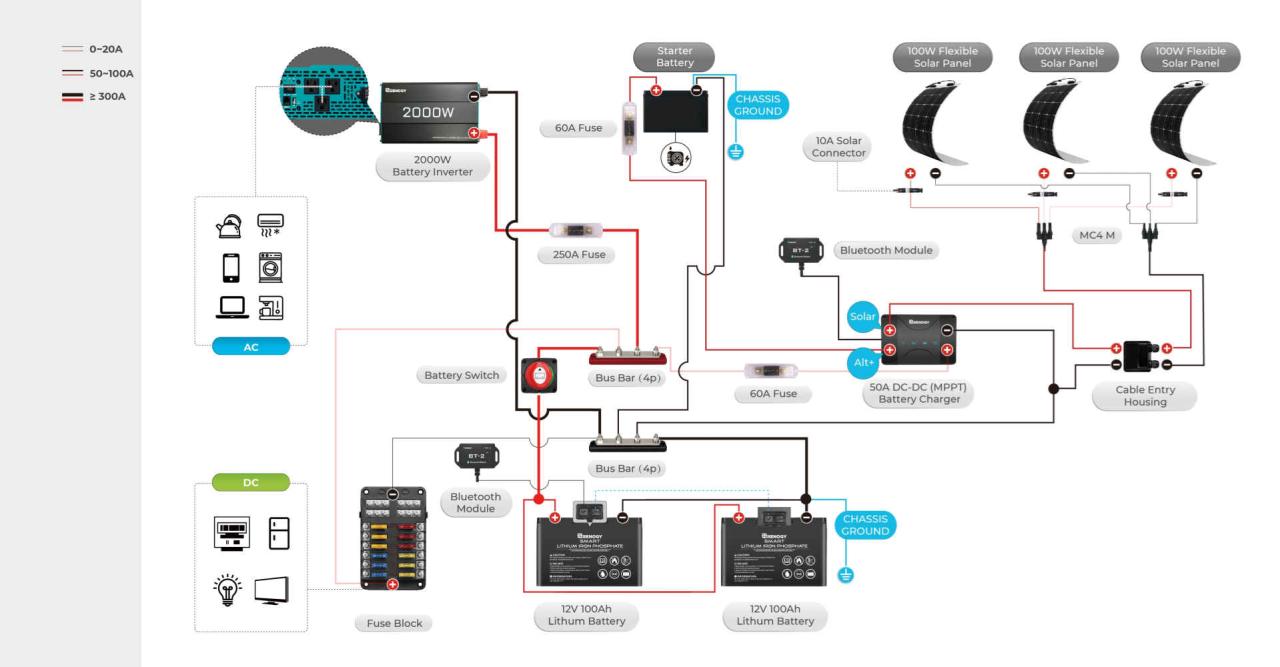
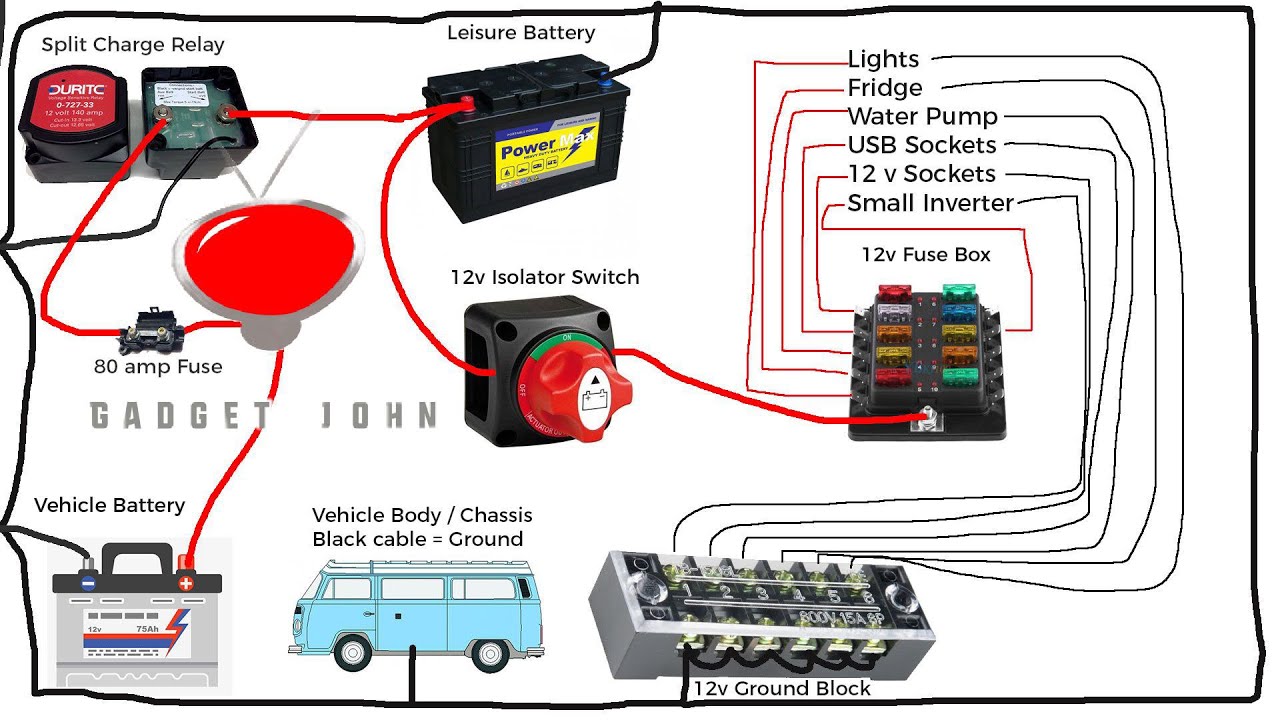
A basic setup typically involves two house batteries connected in parallel to the switch, and the switch then connects to the trailer’s 12V system. The switch also often connects to the charging system from your tow vehicle. A more complex system might incorporate a battery charger, an inverter, and other 12V appliances, all managed through the switch. Visualizing this, imagine a central hub (the switch) distributing power to various branches (appliances and charging systems).
A detailed diagram would show the positive (+) and negative (-) wires clearly connected to each component, with the switch controlling the positive line to prevent short circuits. Incorrect wiring can lead to battery damage or even fire, so professional installation is strongly recommended if you are not comfortable working with electrical systems.
So, you’re an audiophile who travels? Awesome! Check out this guide on building an audiophile travel setup for killer sound on the go. It’s all about finding the right balance between portability and quality. Seriously, don’t underestimate how much better your tunes will sound with a proper setup. And if you’re looking for more in-depth info on choosing the best portable gear, another great resource is this audiophile travel setup guide – it dives deep into component selection.
Happy listening!
Step-by-Step Guide on How to Correctly Install a Battery Switch
Installing a battery switch requires basic electrical knowledge and safety precautions. Always disconnect the negative (-) terminal from your batteries before beginning any work. First, choose a suitable location for the switch, ensuring easy access. Next, run appropriately sized wiring from the batteries to the switch, and from the switch to your trailer’s electrical panel. Use appropriately sized wire connectors and crimp them securely.
Connect the positive (+) wires to the appropriate terminals on the switch, carefully following the switch’s wiring diagram. Then, connect the negative (-) wires, ensuring a secure ground connection. Reconnect the negative terminal to your batteries. After installation, always test the switch in all positions to verify correct functionality and to ensure no short circuits have occurred.
Consult your specific battery switch’s instructions for detailed installation guidance.
Advantages and Disadvantages of Different Battery Switch Designs, Battery switch on travel trailer function
Simple on/off switches are inexpensive and easy to install but offer limited control. Rotary switches provide more control, allowing for selection between battery sources and complete isolation, but can be more complex to wire. Digital switches provide the most features, including battery monitoring and often remote control, but they are generally the most expensive. The best choice depends on your budget, technical skills, and the complexity of your trailer’s electrical system.
For example, a simple camper might only need a basic on/off switch, while a larger RV with multiple batteries and advanced systems would benefit from a more sophisticated switch.
Battery Switch Operation and Maintenance
Properly operating and maintaining your travel trailer’s battery switch is crucial for reliable power and preventing costly repairs. Understanding how it works and performing routine checks will keep your system running smoothly. This section will guide you through the process of switching between your house batteries and your tow vehicle’s battery, provide preventative maintenance tips, and offer troubleshooting advice for common problems.Switching between your house batteries and your tow vehicle’s battery is usually a simple process.
Most battery switches are either a rotary dial or a series of rocker switches. A rotary switch typically has positions for “Off,” “House Batteries,” “Tow Vehicle Batteries,” and sometimes a “Both” position (which should be used cautiously and only for short periods to charge house batteries). Rocker switches usually offer a similar selection. To switch, simply turn the dial or flip the rocker switches to the desired position.
Always double-check the switch’s position to ensure you’ve selected the correct power source. Remember to turn the switch to “Off” when not in use to prevent accidental drain.
Preventing Common Battery Switch Problems
Regular inspection and proper use significantly reduce the risk of battery switch issues. Neglecting maintenance can lead to corrosion, loose connections, and ultimately, switch failure. Keeping your battery terminals clean and free of corrosion is paramount. A simple cleaning with a wire brush and baking soda solution can prevent significant problems. Furthermore, regularly checking the tightness of all connections, including the wires leading to the switch and the batteries themselves, will help maintain a reliable connection and prevent voltage drops.
Avoid using the “Both” position for extended periods, as this can lead to excessive current draw and potential damage to the batteries or switch.
Battery Switch Maintenance Checklist
Before beginning any maintenance, always disconnect the negative terminal of your batteries to prevent accidental short circuits. This is a critical safety precaution.
- Inspect Battery Terminals: Check for corrosion and clean as needed. Use a wire brush and baking soda solution to remove any buildup.
- Check Cable Connections: Ensure all cable connections are tight and secure. Tighten any loose connections.
- Inspect Switch for Damage: Look for any signs of damage, such as cracks, loose components, or excessive heat buildup.
- Test Switch Functionality: Verify that the switch correctly selects and disconnects power to the house and tow vehicle batteries. Use a multimeter to check voltage at each position.
- Lubricate (if applicable): Some battery switches benefit from occasional lubrication of moving parts. Refer to your switch’s manual for specific recommendations.
Troubleshooting Common Battery Switch Issues
Problems like no power or inconsistent power usually stem from simple issues. First, always check the obvious: Is the switch in the correct position? Are the batteries charged? If the switch is in the correct position and the batteries have sufficient charge, check for corrosion on the battery terminals and cable connections. Clean them thoroughly.
If the problem persists, carefully inspect the wiring for breaks or loose connections. A multimeter can help pinpoint voltage drops along the circuit. If you’re still experiencing problems, it’s best to consult a qualified RV technician or electrician. Attempting complex repairs without proper knowledge can lead to further damage or injury.
Battery Switch and Electrical System Integration
The battery switch is the central control point for your travel trailer’s electrical system, acting as a gatekeeper for power flow. Understanding its role is crucial for safe and efficient operation of your RV’s electrical components. It allows you to isolate your house batteries from the chassis battery, preventing accidental discharge and providing control over which power source feeds your appliances.Your battery switch manages the flow of power from your house batteries (typically 12V DC) to various systems within your travel trailer.
This includes the lights, water pump, refrigerator (depending on the model), and other 12V appliances. Additionally, it often plays a role in the charging process of your house batteries, either through the alternator (when connected to the tow vehicle) or through a solar panel system. The interaction between the switch and other electrical components dictates the overall performance and safety of your trailer’s electrical setup.
Battery Switch, Inverter, and Electrical Component Interaction
Imagine a simple diagram: Your travel trailer’s main power source is your house batteries. These batteries are connected to the battery switch. The battery switch acts as a selector, allowing you to either connect the batteries to the trailer’s 12V DC system or disconnect them completely. From the battery switch, 12V power feeds into a distribution panel, supplying power to various 12V appliances.
A separate connection from the battery switch leads to the inverter. The inverter converts the 12V DC power from the batteries into 120V AC power, supplying power to your AC appliances, like microwave ovens, air conditioners (if they run on inverter power), and other 120V items. Finally, an external power source, like a shore power hookup, can also be connected to the distribution panel, bypassing the batteries and directly powering the 120V system.
So, you’re an audiophile who travels? Awesome! Check out this guide on building an audiophile travel setup for killer sound on the go. It’s all about packing smart, prioritizing quality over size, and finding portable gear that doesn’t compromise on sound. And if you’re looking for more advanced tips and tricks for your portable audio setup, another great resource is this one on audiophile travel setups – it delves deeper into specific equipment choices and optimization strategies.
Safety Hazards of Incorrect Battery Switch Operation
Improper operation of the battery switch can lead to several safety hazards. Leaving the switch in the “on” position when the trailer is not in use can drain your house batteries, leaving you without power when you need it. Conversely, switching the batteries on while connected to a shore power supply could potentially damage the charging system of your batteries or even cause a short circuit if there’s a fault in the wiring.
Furthermore, incorrectly connecting or disconnecting the battery switch while working on the electrical system could result in electric shock.
Best Practices for Safe Battery Switch Usage
Safe battery switch usage is paramount for the longevity and safe operation of your travel trailer’s electrical system. Before undertaking any electrical work, always turn off the battery switch to prevent accidental shocks or short circuits. Regularly check your battery terminals for corrosion and clean them as needed to maintain good electrical connections. When storing your trailer for extended periods, turn off the battery switch to prevent battery drain.
Consider using a battery disconnect switch that is specifically designed for this purpose to further protect against accidental power draw. When hooking up to shore power, ensure the switch is in the correct position to prevent damage to charging systems or short circuits. Familiarize yourself with your trailer’s specific electrical system layout and consult your owner’s manual for detailed instructions.
Types of Batteries and their Compatibility with Battery Switches: Battery Switch On Travel Trailer Function
Choosing the right battery and battery switch for your travel trailer is crucial for reliable power. Different battery types have varying characteristics that affect both performance and compatibility with your switch. Understanding these differences will help you select the optimal system for your needs.
Lead-acid and lithium-ion batteries are the most common choices for RVs and travel trailers. Each has its own advantages and disadvantages, and these differences directly influence which battery switch is appropriate.
Lead-Acid Battery Characteristics and Switch Compatibility
Lead-acid batteries, the traditional choice, are relatively inexpensive and readily available. However, they’re heavier, have a shorter lifespan than lithium-ion, and are more susceptible to damage from deep discharges. When selecting a battery switch for lead-acid batteries, ensure it’s rated for the appropriate amperage and voltage. Most standard battery switches are compatible with lead-acid, but always check the manufacturer’s specifications.
For example, a dual-battery setup with two 12V lead-acid batteries will require a switch rated for at least the combined amperage draw of both batteries.
Lithium-Ion Battery Characteristics and Switch Compatibility
Lithium-ion batteries offer significant advantages over lead-acid: they’re lighter, have a longer lifespan, and can handle deeper discharges without damage. However, they are generally more expensive. A critical consideration with lithium-ion batteries is their voltage. While lead-acid batteries are typically 12V, lithium-ion batteries might be 12V, 24V, or even higher. You’ll need a battery switch specifically designed for the voltage of your lithium-ion battery bank.
Some switches are specifically designed for lithium batteries and incorporate features like battery management systems (BMS) compatibility, which is crucial for safe and efficient operation of lithium-ion batteries.
Battery Configurations and Switch Selection
The number of batteries you use impacts switch selection. A single battery setup is straightforward; you only need a switch that can handle the battery’s voltage and amperage. A dual-battery setup, common for increased capacity, requires a switch capable of managing both batteries. Here, you’ll often find switches with options to isolate or combine batteries, allowing you to charge and use batteries independently or in parallel.
More complex systems with multiple batteries and potentially different battery chemistries (e.g., combining lead-acid and lithium) require more sophisticated battery management systems and switches designed for such configurations. Consult with an RV electrician to ensure proper system design.
Connecting Different Battery Types to a Battery Switch
Properly connecting your batteries to the switch is paramount for safety and performance. The connection method will vary depending on the battery type and the switch design. Always disconnect the negative terminal first when working with batteries. Refer to your battery and switch manuals for specific instructions.
| Battery Type | Connection Method | Safety Precautions |
|---|---|---|
| Lead-Acid | Use appropriately sized cables and connectors. Connect positive (+) to positive and negative (-) to negative. Secure connections to prevent arcing. | Always disconnect the negative terminal first. Wear safety glasses. Ensure good ventilation to avoid exposure to hydrogen gas. |
| Lithium-Ion | Use appropriately sized cables and connectors designed for lithium-ion batteries. Connect positive (+) to positive and negative (-) to negative. Follow the manufacturer’s instructions for your specific battery and switch. | Always disconnect the negative terminal first. Lithium-ion batteries can be sensitive to overcharging and discharging; use a compatible BMS and charger. Consult the manufacturer’s guidelines for safe handling and storage. |
Mastering your travel trailer’s battery switch is a game-changer for any RV owner. By understanding its function, performing regular maintenance, and knowing how to troubleshoot common issues, you’ll significantly reduce the risk of electrical problems on the road. This empowers you to enjoy more reliable power and a more comfortable camping experience, allowing you to focus on the fun parts of RVing!
Popular Questions
What happens if my battery switch is faulty?
A faulty switch can lead to power loss, inconsistent power supply, or even damage to your batteries or other electrical components. It might not switch properly between batteries or may not provide a complete disconnect.
How often should I check my battery switch?
Regularly inspect your switch for corrosion, loose connections, and proper operation – at least once a month or before each trip.
Can I use any battery switch with any type of battery?
No, different battery types (lead-acid vs. lithium-ion) have different voltage and current requirements. Use a switch specifically designed for your battery type to avoid damage or safety hazards.
How do I know which battery is being used (house or tow vehicle)?
This depends on your switch design. Some have indicator lights, while others require checking the connections to determine which battery is active.
